Creating artistic images from Strava rides

firstimage
Four laps of Richmond Park

When you upload a ride, Strava draws a map using the longitude and latitude coordinates recorded by your GPS device. This article explores ways in which these numbers, along with other metrics, can be used to create interesting images that might have some artistic merit.

The idea was motivated by the huge advances made in the field of Deep Learning, particularly applications for image recognition. However, since datasets come in all shapes and forms, researchers have explored ways of converting different types of data into images.  In a paper published in 2015, the authors achieved success in identifying standard time series by converting them into images.

GPS bike computers typically record snapshots of information every second. What kind of images could these time series generate? It turns out that there are several ways to convert a time series into an image.

Spectrogram

Creating a spectrogram is a standard approach from signal processing that is particularly useful for analysing acoustic files. The spectrogram is a heat map that shows how the underlying frequencies contributing to the signal change over time. Technically, it is derived by calculating the discrete Fourier transform of a window that slides across the time series. I applied this to my regular Saturday morning club ride of four laps around Richmond Park. The image changes a bit once the ride gets going after about 1200 seconds (20 minutes), but, frankly, the result was not particularly illuminating. There is no obvious reason to consider cycling power data as a superposition of frequencies.

spectrogram

Ah! Now we are getting somewhere

The authors of the referenced paper took a different approach to produce things called Gramian Angular Summation Field (GASF), Gramian Angular Difference Field (GADF), and Markov Transition Field (MTF). Read the paper if want to know the details. I created these and something call a Recurrence Plot. All of these methods generate a matrix, by combining every element in the time series with every other element. The underling observations occurring at times t_{1} and t_{2} determine the colour of the pixel at position (t_{1}, t_{2}). Images are symmetric along the lower-left to upper-right diagonal, apart from GADF, which is antisymmetric.

Let’s see how do they look for on four laps of Richmond Park. We have six time series, with corresponding sets of images below. The segmentation of the images is due to periodicity of the data. This is particularly clear in the geographic data (longitude, latitude and altitude). The higher intensity of the main part of the ride is most obvious in the heart rate data. The MTF plots are quite interesting. Scroll down through the images to the next section

data1
Raw time series of power, heart rate, cadence, longitude, latitude and altitude
gasf
Gramian Angular Sum Field
gadf
Gramian Angular Difference Field
mtf
Markov Transition Field
rp
Recurrence Plot

From cycle ride to art

It is one thing to create an image of each item, but how can we combine these to summarise a ride in a single image. I considered two methods of combining time series into a single image: a) create a new image where the vertical and horizontal axes represent different series and b) create a new image by simply adding the corresponding values from two underlying images.

One problem is that some cyclists don’t have gadgets like heart rate monitors and power meters, so I initially restricted myself to just the longitude, latitude and altitude data. Nevertheless, as noted in an earlier blog, it is possible to work out speed, because the time interval is one second between each reading. Furthermore, one can estimate power, from the speed and changes in elevation.

Another problem is that rides differ in length. For this I split the ride into, say, 128 intervals and took the last observation in each interval. So for a 3 hour ride, I’d be sampling about once every 84 seconds.

The chart at the top of this blog was created by first normalising each series to a standard range (-1, +1). Method a) was used to create two images: longitude was added to latitude and altitude was multiplied by speed. These were added using method b). Using these measures will produce pretty much the same chart each time the ride is done. In contrast, an image that is totally unique to the ride can be produced using data relating to the individual rider. The image below uses the same recipe to combine speed, heart rate, power and cadence. If this had been a particularly special ride, the image would be a nice personal memento.

lastimage
A different take on four laps of Richmond Park

For anyone interested in the underlying code, I have posted a Jupyter notebook here.

References

Encoding Time Series as Images for Visual Inspection and Classification Using Tiled Convolutional Neural Networks, Wang Z Oates T, https://www.aaai.org/ocs/index.php/WS/AAAIW15/paper/viewFile/10179/10251


Strava – Automatic Lap Detection

Screen Shot 2018-08-04 at 16.30.58
Opening Laps of Hillingdon Race

As you upload your data, you accumulate a growing history of rides. It is helpful to find ways of classifying different types of activities. Races and training sessions often include laps that are repeated during the ride. Many GPS units can automatically record laps as you pass the point where you began your ride or last pressed the lap button. However, if the laps were not recorded on the device, it is tricky to recover them. This article investigates how to detect laps automatically.

First consider the simple example of a 24 lap race around the Hillingdon cycle circuit. Plotting the GPS longitude and latitude against time displays repeating patterns. It is even possible to see the “omega curve” in the longitude trace. So it should be possible to design an algorithm that uses this periodicity to calculate the number of laps.

Screen Shot 2018-08-03 at 19.07.16This is a common problem in signal processing, where the Fourier Transform offers a neat solution. This effectively compares the signal against all possible frequencies and returns values with the best fit in the form of a power spectrum. In this case, the frequencies correspond to the number of laps completed during the race. In the bar chart below, the power spectrum for latitude shows a peak around 24. The high value at 25 probably shows up because I stopped my Garmin slightly after the finish line. A “harmonic” also shows up at 49 “half laps”. Focussing on the peak value, it is possible to reconstruct the signal using a frequency of 24, with all others filtered out.

Screen Shot 2018-08-03 at 19.20.38Screen Shot 2018-08-03 at 19.24.53

So we’re done – we can use a Fourier Transform to count the laps! Well not quite. The problem is that races and training sessions do not necessarily start and end at exactly the starting point of a lap. As a second example, consider my regular Saturday morning club run, where I ride from home to the meeting point at the centre of Richmond Park, then complete four laps before returning home. As show in the chart below, a simple Fourier Transform approach suggests that ride covered 5 laps, because, by chance, the combined time for me to ride south to the park and north back home almost exactly matches the time to complete a lap of the park. Visually it is clear that the repeating pattern only holds for four laps.

Screen Shot 2018-08-03 at 19.35.07

Although it seems obvious where the repeating pattern begins and ends, the challenge is to improve the algorithm to find this automatically. A brute force method would compare every GPS location with every other location on the ride, which would involve about 17 million comparisons for this ride, then you would need to exclude the points closely before or after each recording, depending on the speed of the rider. Furthermore, the distance between two GPS points involves a complex formula called the haversine rule that accounts for the curvature of the Earth.

Fortunately, two tricks can make the calculation more tractable. Firstly, the peak in the power spectrum indicates roughly how far ahead of the current time point to look for a location potentially close to the current position. Given a generous margin of, say, 15% variation in lap times, this reduces the number of comparisons by a whole order of magnitude. Secondly, since we are looking for points that are very close together, we only need to multiply the longitudes by the cosine of the latitude (because lines of longitude meet at the poles) and then a simple Euclidian sum the squares of the differences locates points within a desired proximity of, say, 10 metres.  This provides a quicker way to determine the points where the rider was “lapping”. These are shaded in yellow in the upper chart and shown in red on a long/latitude plot below. The orange line on the upper chart shows, on the right hand scale, the rolling lap time, i.e. the number of seconds to return to each point on the lap, from which the average speed can be derived.

Screen Shot 2018-08-03 at 20.26.18

Two further refinements were required to make the algorithm more robust. One might ask whether it makes a difference using latitude or longitude. If the lap involved riding back and forth along a road that runs due East-West, the laps would show up on longitude but not latitude. This can be solved by using a 2-dimensional Fourier Transform and checking both dimensions. This, in turn, leads to the second refinement, exemplified by the final example of doing 12 ascents of the Nightingale Lane climb. The longitude plot includes the ride out to the West, 12 reps and the Easterly ride back home.

Screen Shot 2018-08-03 at 20.34.02

The problem here was that the variation in longitude/latitude on the climb was tiny compared with the overall ride. Once again, the repeating section is obvious to the human eye, but more difficult to unpick from its relatively low peak in the power spectrum. A final trick was required: to consider the amplitude of each frequency in decreasing order of power and look out for any higher frequency peaks that appear early on the list. This successfully identified the relevant part of the ride, while avoiding spurious observations for rides that did not include laps.

The ability for an algorithm to tag rides if they include laps is helpful for classifying different types of sessions. Automatically marking the laps would allow riders and coaches to compare laps against each other over a training session or a race. A potential AI-powered robo-coach could say “Ah, I see you did 12 repeats in your session today… and apart from laps 9 and 10, you were getting progressively slower….”


Strava Power Curve

Screen Shot 2018-05-11 at 16.34.08
Comparing Historic Power Curves

If you use a power meter on Strava premium, your Power Curve provides an extremely useful way to analyse your rides. In the past, it was necessary to perform all-out efforts, in laboratory conditions, to obtain one or two data points and then try to estimate a curve. But now your power meter records every second of every ride. If you have sustained a number of all-out efforts over different time intervals, your Power Curve can tell you a lot about what kind of rider you are and how your strengths and weaknesses are changing over time.

Strava provides two ways to view your Power Curve: a historical comparison or an analysis of a particular ride. Using the Training drop-down menu, as shown above, you can compare two historic periods. The curves display the maximum power sustained over time intervals from 1 second to the length of your longest ride. The times are plotted on a log scale, so that you can see more detail for the steeper part of the curve. You can select desired time periods and choose between watts or watts/kg.

The example above compares this last six weeks against the year to date. It is satisfying to see that the six week curve is at, or very close to, the year to date high, indicating that I have been hitting new power PBs (personal bests) as the racing season picks up. The deficit in the 20-30 minute range indicates where I should be focussing my training, as this would be typical of a breakaway effort. The steps on the right hand side result from having relatively few very long rides in the sample.

Note how the Power Curve levels off over longer time periods: there was a relatively small drop from my best hour effort of 262 watts to 243 watts for more than two hours. This is consistent with the concept of a Critical Power that can be sustained over a long period. You can make a rough estimate of your Functional Threshold Power by taking 95% of your best 20 minute effort or by using your best 60 minute effort, though the latter is likely to be lower, because your power would tend to vary quite a bit due to hills, wind, drafting etc., unless you did a flat time trial. Your 60 minute normalised power would be better, but Strava does not provide a weighted average/normalised power curve. An accurate current FTP is essential for a correct assessment of your Fitness and Freshness.

Switching the chart to watts/kg gives a profile of what kind of rider you are, as explained in this Training Peaks article. Sprinters can sustain very high power for short intervals, whereas time trial specialists can pump out the watts for long periods. Comparing myself against the performance table, my strengths lie in the 5 minutes to one hour range, with a lousy sprint.

Screen Shot 2018-05-11 at 17.19.45.png
Single Ride Power Curve versus Historic

The other way to view your Power Curve comes under the analysis of a particular ride. This can be helpful in understanding the character of the ride or for checking that training objectives have been met. The target for the session above was to do 12 reps on a short steep hill. The flat part of the curve out to about 50 seconds represents my best efforts. Ideally, each repetition would have been close to this. Strava has the nice feature of highlighting the part of the course where the performance was achieved, as well as the power and date of the historic best. The hump on the 6-week curve at 1:20 occurred when I raced some club mates up a slightly longer steep hill.

If you want to analyse your Power Curve in more detail, you should try Golden Cheetah. See other blogs on Strava Fitness and Freshness, Strava Ride Statistics or going for a Strava KOM.


Suddenly Summer in Richmond Park

Tour de Richmond Park Leaderboard – year to date 2018

Screen Shot 2018-04-20 at 14.54.42

This week’s dramatic change in the weather has seen a string of quick laps recorded for the Tour de Richmond Park. Twelve out of the fastest fifteen efforts were completed on 18/19 April. Apart from the sheer pleasure of finally being able to ride in short sleeves, two meteorological factors came into play: higher temperatures and a favourable wind direction.

As noted in an earlier blog, changes in temperature have a far greater impact on air density than variations in atmospheric pressure and humidity. When I completed a lap last week, the temperature was 6oC, but on 19 April it was closer to 26oC. The warmer weather had the effect of reducing air density by more than 7%. Theoretically, this should allow you to ride about 2% faster for the same effort. Using a physics model I built last year to analyse Strava segments, it is possible to estimate the effect of variations in the factors that determine your position on the leaderboard. Based on an average power of 300W and some reasonable estimates of other variables, this rise in temperature would reduce your time from 16:25 to 16:04 (as expected, 2% quicker).

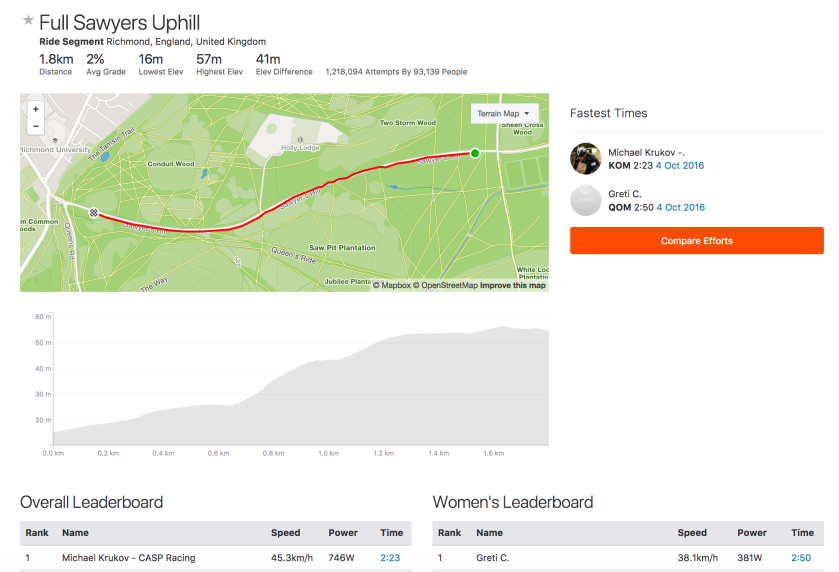
The other key factor is the wind. On 18/19 April, it was blowing from the south or southeast. This was not the mythical easterly that provides a tailwind up Sawyers Hill, but according to the analysis in another earlier blog, it is generally beneficial for doing a quick lap around the park.

I clocked up a decent time this morning, to reach 15th place on the year-to-date leaderboard, but I failed to take my own advice on the best time of day. The traffic tends to be lighter first thing in the morning or in the evening, when the park closes. After waiting until mid-morning for the temperature to rise, I ended up being blocked by slow-moving vehicles on two occasions.

Although it was frustrating having to brake for traffic, the really puzzling thing was an average power reading of 254W. This is much lower than the other riders on the leaderboard. Last week, I did a lap in 16:44 at an average power of 313W, which seems much more reasonable. Admittedly, I was wearing a skin suit today, but that would not have saved 50W. It is possible that I had some drafting benefit from the numerous cars in the park and some favourable gusts of wind. However, my suspicion is that my Garmin Vector pedals had not calibrated correctly, after I switched them from my road bike, before today’s ride.

The concluding message is get on your bike and enjoy the sunshine. And why not try to beat your best time for the Tour de Richmond Park?


Kings and Queens of the Mountains

Screen Shot 2017-11-09 at 18.40.09.png

I guess that most male cyclists don’t pay much attention to the women’s leaderboards on Strava. And if they do it might just be to make some puerile remark about boys being better than girls. From a scientific perspective the comparison of male and female times leads to some interesting analysis.

Assuming both men and women have read my previous blogs on choosing the best time, weather conditions and wind directions for the segment that suits their particular strengths, we come back to basic physics.

KOM or QOM time = Work done / Power = (Work against gravity + Drag x Distance + Rolling resistance x Distance) / (Mass x Watt/kg)

Of the three components of work done, rolling resistance tends to be relatively insignificant. On a very steep hill, most of the work is done against gravity, whereas on a flat course, aerodynamic drag dominates.

The two key factors that vary between men and women are mass and power to weight ratio (watts per kilo).  A survey published by the ONS in 2010, rather shockingly reported that the average British man weighed 83.6kg, with women coming in at 70.2kg. This gives a male/female ratio of 1.19. KOM/QOM cyclists would tend to be lighter than this, but if we take 72kg and 60kg, the ratio is still 1.20.

Males generate more watts per kilogram due to having a higher proportion of lean muscle mass. Although power depends on many factors, including lungs, heart and efficiency of circulation, we can estimate the relative power to weight ratio by comparing the typical body composition of males and females. Feeding the ONS statistics into the Boer formula gives a lean body mass of 74% for men and 65% for women, resulting in a ratio of 1.13. This can be compared against the the useful table on Training Peaks showing maximal power output in Watts/kg, for men and women, over different time periods and a range of athletic abilities. The table is based on the rows showing world record performances and average untrained efforts.  For world champion five minute efforts and functional threshold powers, the ratios are consistent with the lean mass ratio. It makes sense that the ratio should be higher for shorter efforts, where the male champions are likely to be highly muscular. Apparently the relative performance is precisely 1.21 for all durations in untrained people.

Screen Shot 2017-11-08 at 10.23.33

On a steep climb, where the work done against gravity dominates, the benefit of additional male muscle mass is cancelled by the fact that this mass must be lifted, so the difference in time between the KOM and the QOM is primarily due to relative power to weight ratio. However, being smaller, women suffer from the disadvantage that the inert mass of bike represents a larger proportion of the total mass that must be raised against gravity. This effect increases with gradient. Accounting for a time difference of up to 16% on the steepest of hills.

In contrast, on a flat segment, it comes down to raw power output, so men benefit from advantages in both mass and power to weight ratio. But power relates to the cube of the velocity, so the elapsed time scales inversely with the cube root of power. Furthermore, with smaller frames, women present a lower frontal area, providing a small additional advantage. So men can be expected to have a smaller time advantage of around 9%. In theory the advantage should continue to narrow as the gradient shifts downhill.

Theory versus practice

Strava publishes the KOM and QOM leaderboards for all segments, so it was relatively straightforward to check the basic model against a random selection of 1,000 segments across the UK. All  leaderboards included at least 1,666 riders, with an overall average of 637 women and 5,030 men. One of the problems with the leaderboards is that they can be contaminated by spurious data, including unrealistic speeds or times set by groups riding together. To combat this, the average was taken of the top five times set on different dates, rather than simply to top KOM or QOM time.

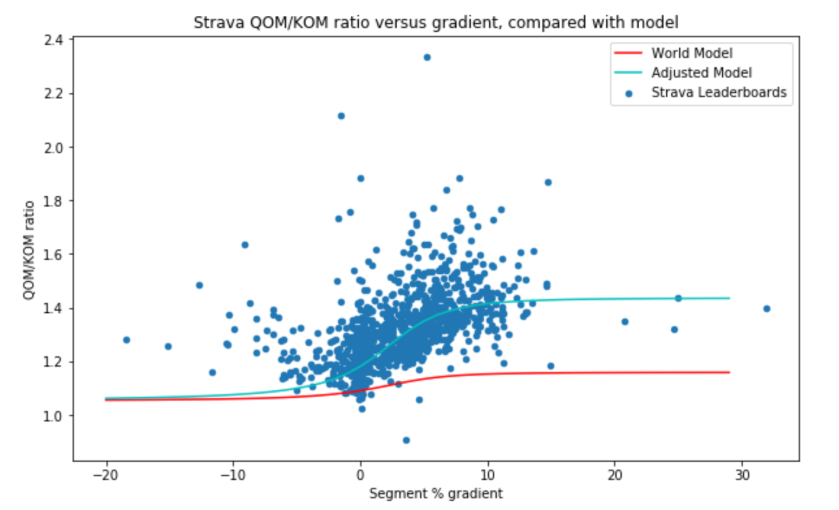
The average segment length was just under 2km, up a gradient of 3%. The following chart plots the ratio of the QOM time to the KOM time versus gradient compared with the model described above. The red line is based on the lean body mass/world record holders estimate of 1.13, whereas the average QOM/KOM ratio was 1.32. Although there is a perceivable upward slope in the data for positive gradients, clearly this does not fit the data.

Screen Shot 2017-11-09 at 17.54.43

Firstly, the points on the left hand side indicate that men go downhill much more fearlessly than women, suggesting a psychological explanation for the observations deviating from the model. To make the model fit better for positive gradients, there is no obvious reason to expect the weight ratio of male to female Strava riders to deviate from the general population, so this leaves only the relative power to weight ratio. According to the model the QOM/KOM ratio should level off to the power to weight ratio for steep gradients. This seems to occur for a value of around 1.40, which is much higher than the previous estimates of 1.13 or the 1.21 for untrained people. How can we explain this?

A notable feature of the data set was that sample of 1,000 Strava segments was completed by nearly eight times as many men as women. This, in turn reflects the facts that there are more male than female cyclists in the UK and that men are more likely to upload, analyse, publicise and gloat over their performances than women.

Having more men than women, inevitably means that the sample includes more high level male cyclists than equivalent female cyclists. So we are not comparing like with like. Referring back to the Training Peaks table of expected power to weight ratios, a figure of 1.40 suggests we are comparing women of a certain level against men of a higher category, for example, “very good” women against “excellent” men.

A further consequence of having far more men than women is that is much more likely that the fastest times were recorded in the ideal conditions described in my previous blogs listed earlier.

Conclusions

There is room for more women to enjoy cycling and this will push up the standard of performance of the average amateur rider. This would enhance the sport in the same way that the industry has benefited as more women have joined the workforce.

The fractal nature of GPS routes

The mathematician, Benoît Mandelbrot, once asked “How long is the coast of Britain?“. Paradoxically, the answer depends on the length of your measuring stick. Using a shorter ruler results in a longer total distance, because you take account of more minor details of the shape of the coastline. Extrapolating this idea, reducing the measurement scale down to take account of every grain of sand, the total length of the coast increases without limit.

This has an unexpected connection with the data recorded on a GPS unit. Cycle computers typically record position every second. When riding at 36km/h, a record is stored every 10 metres, but at a speed of 18k/h, a recording is made every 5 metres. So riding as a lower speed equates to measuring distances with a shorter ruler. When distance is calculated by triangulating between GPS locations, your riding speed affects the result, particularly when you are going around a sharp corner.

Consider two cyclists riding round a sharp 90-degree bend with a radius of 13m. The arc has a length of 20m, so the GPS has time to make four recordings for the a rider doing 18km/h, but only two recordings for the rider doing 36km/h. The diagram below shows that the faster rider will have a record of position at each red dot, while the slower rider also has a reading for each green dot.  Although the red and green distances match on the straight section, when it comes to the corner the total length of the red line segments is less than the total of the green segments. You can see this jagged effect if you zoom into a corner on the Strava map of your course. Both triangulated distances are shorter than the actual arc ridden.

Cornering.pngIt is relatively straightforward to show that the triangulation method will underestimate both distance and speed by a factor of 2r/s*sin(s/2r), where r is the radius of the corner in metres and s is speed in m/s. So the estimated length of the 20m arc for the fast rider is 19.4m ridden at a speed of 35.1km/h (2.5% underestimate), while the corresponding figures for the slower rider would be 19.8m at 17.9km/h (0.6% underestimate).

We might ask whether these underestimates are significant, given the error in locating real-time positions using GPS. Over the length of a ride, we should expect GPS errors to average out to approximately zero in all directions. However, triangulation underestimates distance on every corner, so these negative errors accumulate over the ride. Note that when the bike is stationary, any noise in the GPS position adds to the total distance calculated by triangulation. But guess what? This can only happen when you are not moving fast. The case remains that slower riders will show a longer total distance than faster riders.

The simple triangulation method described above does not take account of changes of elevation. This has a relatively small effect, except on the steepest gradients, thus a 10% climb increases in distance by only 0.5%.  In fact, the only reliable way to measure distance that accounts for corners and changes in altitude is to use a correctly-calibrated wheel-based device. Garmin’s GSC-10 speed and cadence monitor tracks the passage of magnets on the wheel and cranks, transmitting to the head unit via ANT+. This gives an accurate measure of ground speed, as long as the correct wheel size is used (and, of course, that changes with the type of tyre, air pressure, rider weight etc.).

According to Strava Support, Garmin uses a hierarchy for determining distance. If you have a PowerTap hub, its distance calculation takes precedence. Next, if you have a GSC-10, its figure is used. Otherwise the GPS positions are used for triangulation. This means that, if you don’t have a PowerTap or a GSC-10 speed/cadence meter, your distance (and speed) measurements will be subject to the distortions described above.

But does this really matter? Well it depends on how “wiggly” a route you are riding. This can be estimated using Richardson’s method. The idea is that you measure the route using different sized rulers and see how much the total distance changes. The rate of change determines the fractal dimension, which we can take as the “wiggliness” of the route.

One way of approximating this method from your GPS data is, firstly, to add up all the distances between consecutive GPS positions,  triangulating latitude and longitude. Then do the same using every other position. Then every fourth position, doubling the gap each time. If you happened to be riding at a constant 36km/h, this equates to measuring distance using a 10m ruler, then a 20m ruler, then a 40m ruler etc..

Using this approach, the fractal dimension of a simple loop around the Surrey countryside is about 1.01, which is not much higher than a straight line of dimension 1. So, with just a few corners, the GPS triangulation error will be low. The Sella Ronda has a fractal dimension of 1.11, reflecting the fact that alpine roads have to follow the naturally fractal-like mountain landscape. Totally contrived routes can be higher, such as this one, with a fractal dimension of 1.34, making GPS triangulation likely to be pretty inaccurate – if you zoom in, lots of corners are cut.

In conclusion, if you ride fast around a wiggly course, your Garmin will experience non-relativistic length contraction. Having GPS does not make your wheel-based speed/cadence monitor redundant.

If you are interested in the code used for this blog, you can find it here.

Strava Fitness and Freshness

The last blog explored the statistics that Strava calculates for each ride. These feed through into the Fitness & Freshness chart provided for premium users. The aim is to show the accumulated effect of training through time, based on the Training-Impulse model originally proposed by Eric Banister and others in a rather technical paper published in 1976.

Strava gives a pretty good explanation of Fitness and Freshness. A similar approach is used on Training Peaks in its Performance Management Chart. On Strava, each ride is evaluated in terms of its Training Load, if you have a power meter, or a figure derived from your Suffer Score, if you just used a heart rate monitor. A training session has a positive impact on your long-term fitness, but it also has a more immediate negative effect in terms of fatigue. The positive impact decays slowly over time, so if you don’t keep up your training, you lose fitness. But your body is able to recover from fatigue more quickly.

The best time to race is when your fitness is high, but you are also sufficiently recovered from fatigue. Fitness minus fatigue provides an estimate of your form. The 1976 paper demonstrated a correlation between form and the performance of an elite swimmers’ times over 100m.

The Fitness and Freshness chart is particularly useful if you are following a periodised training schedule. This approach is recommended by many coaches, such as Joe Friel. Training follows a series of cycles, building up fitness towards the season’s goals. A typical block of training includes a three week build-up, followed by a recovery week. This is reflected in a wave-like pattern in your Fitness and Freshness chart. Fitness rises over the three weeks of training impulses, but fatigue accumulates faster, resulting in a deterioration of form. However, fatigue drops quickly, while fitness is largely maintained during the recovery week, allowing form to peak.

In order to make the most of the Fitness and Freshness charts, it is important that you use an accurate current figure for your Functional Threshold Power. The best way to do this is to go and do a power test. It is preferable to follow a formal protocol that you can repeat, such as that suggested by British Cycling. Alternatively, Strava premium users can refer to the Strava Power Curve. You can either take your best effort over 1 hour or 95% of your best effort over 20 minutes. Or you can click on the “Show estimated FTP” button  and take the lower figure. In order for this to flow through into your Fitness and Freshness chart, you need to enter your 1 hour FTP into your personal settings, under “My Performance”.

Screen Shot 2018-05-08 at 15.14.00

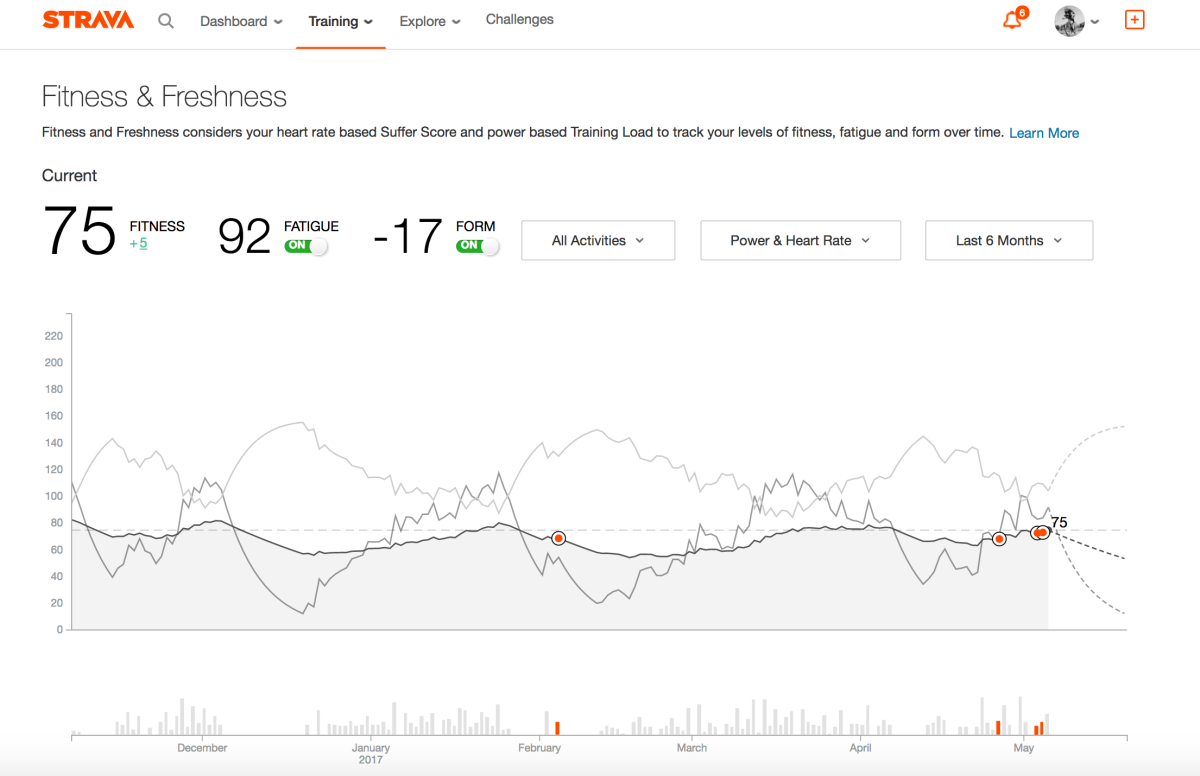
The example chart at the top of this blog shows how my season has panned out so far. After taking a two week break before Christmas, I started a solid block of training in January. My recovery week was actually spent skiing (pretty hard), though this did not register on Strava because I did not use a heart rate monitor. So the sharp drop in fatigue at the end of January is exaggerated. Nevertheless, my form was positive for my first race on 4 February. Unfortunately, I was knocked off and smashed a few ribs, forcing me to take an unplanned two week break. By the time I was able to start riding tentatively, rather than starting from an elevated level, my fitness had deteriorated to December’s trough.

After a solid, but still painful, block of low intensity training in March, I took another “recovery week” on the slopes of St Anton. I subsequently picked up a cold that delayed the start of the next block of training, but I have incorporated some crit races into my plan, for higher intensity sessions. If you edit the activity and make the “ride type” a “race”, it shows up as a red dot on the chart. Barring accident and illness, the hope is to stick more closely to a planned four-week cycle going forward.

This demonstrates how Strava’s tools reveal the real-life difficulties of putting the theoretical benefits of periodisation into practice.

Related posts

Modelling Strava Fitness and Freshness

Supercompensating with Strava

See other blogs on Strava Power Curve, Strava Ride Statistics or going for a Strava KOM.

Strava Ride Statistics

If you ride with a power meter and a heart rate monitor, Strava’s premium subscription will display a number of summary statistics about your ride. These differ from the numbers provided by other software, such as Training Peaks. How do all these numbers relate to each other?

A tale of two scales

Over the years, coaches and academics have developed statistics to summarise the amount of physiological stress induced by different types of endurance exercise. Two similar approaches have gained prominence. Dr Andrew Coggan has registered the names of several measures used by Training Peaks. Dr Phil Skiba has developed as set of metrics used in the literature and by PhysFarm Training Systems. These and other calculations are available on Golden Cheetah‘s excellent free software.

Although it is possible to line up metrics that roughly correspond to each other, the calculations are different and the proponents of each scale emphasise particular nuances that distinguish them. This makes it hard to match up the figures.

Here is an example for a recent hill session. The power trace is highly variable, because the ride involved 12 short sharp climbs.

Metric Coggan TrainingPeaks Skiba Literature Strava
Power equivalent physiological cost of ride Normalised Power 282 xPower 252 Weighted Avg Power 252
Power variability of ride Variability Index 1.57 Variability Index 1.41
Rider’s sustainable power Functional Threshold Power 312 Critical Power 300 FTP 300
Power cost / sustainable power Intensity Factor 0.9 Relative Intensity 0.84 Intensity 0.84
Assessment of intensity and duration of ride Training Stress Score 117 BikeScore 101 Training Load 100
Training Impulse based on heart rate Suffer Score 56

Weighted Average Power

According to Strava, Weighted Average Power takes account of the variability of your power reading during a ride. “It is our best guess at your average power if you rode at the exact same wattage the entire ride.” That sounds an awful lot like Normalized Power, which is described on Training Peaks as “an estimate of the power that you could have maintained for the same physiological “cost” if your power output had been perfectly constant (e.g., as on a stationary cycle ergometer), rather than variable”. But it is apparent from the table above that Strava is calculating Skiba’s xPower.

The calculations of Normalized Power and xPower both smooth the raw power data, raise these observations to the fourth power, take the average over the whole ride and obtain the fourth root to give the answer.

Normalized Power or xPower = (Average(Psmoothed4))1/4

The only difference between the calculations is the way that smoothing accounts for the body’s physiological delay in reacting to rapid changes in pedalling power. Normalized Power uses a 30 second moving average, whereas xPower uses a “25 second exponential average”. According to Skiba, exponential decay is better than Coggan’s linear decay in representing the way the body reacts to changes in effort.

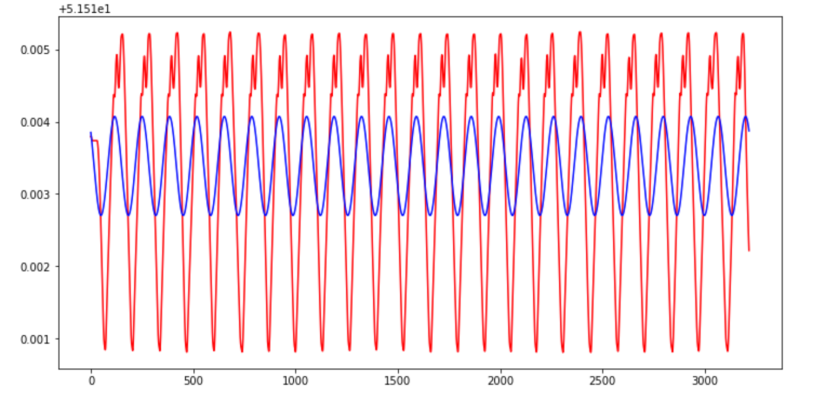
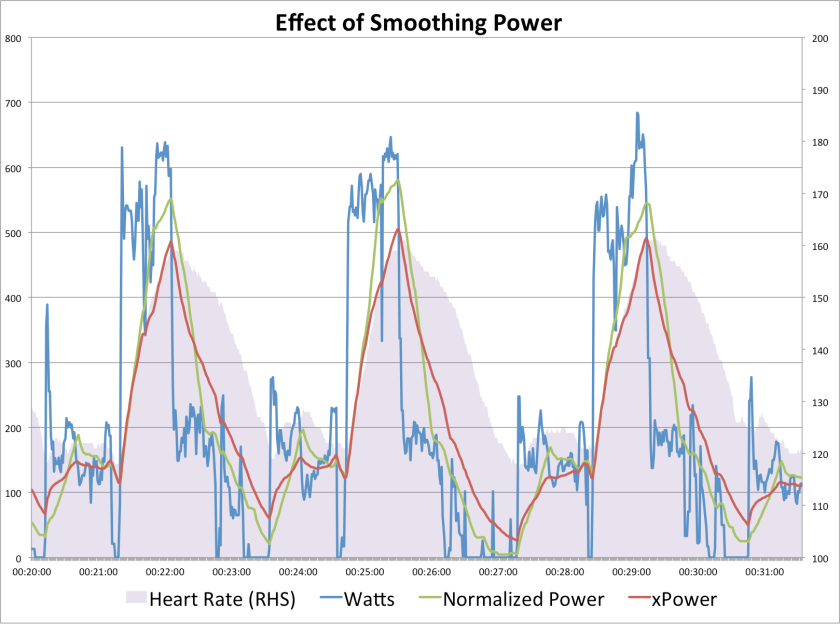
The following chart zooms into part of the hill reps session, showing the raw power output (in blue), moving average smoothing for Normalised Power (in green), exponential smoothing for xPower (in red), with heart rate shown in the background (in grey). Two important observations can be made. Firstly, xPower’s exponential smoothing is more highly correlated with heart rate, so it could be argued that it does indeed correspond more closely with the underlying physiological processes. Secondly, the smoothing used for xPower is less volatile, therefore xPower will always be lower than Normalized Power (because the fourth-power scaling is dominated by the highest observations).

Power

Why do both metrics take the watts and raise them to the fourth power? Coggan states that many of the body’s responses are “curvilinear”. The following chart is a good example, showing the rapid accumulation of blood lactate concentration at high levels of effort.

Screen Shot 2017-04-20 at 15.08.31

Plotting the actual data from a recent test on a log-log scale, I obtained a coefficient of between 3.5 and 4.7, for the relation between lactate level and watts. This suggests that taking the average of smoothed watts raised to the power 4 gives an indication of the average level of lactate in circulation during the ride.

The hill reps ride included multiple bouts of high power, causing repeated accumulation of lactate and other stress related factors. Both the Normalised Power of 282W and xPower of 252W were significantly higher than the straight average power of 179W. The variability index compares each adjusted power against average power, resulting in variability indices of 1.57 and 1.41 respectively. These are very high figures, due to the hilly nature of the session. For a well-paced time trial, the variability index should be close to 1.00.

Sustainable Power

It is important for a serious cyclist to have a good idea of the power that he or she can sustain for a prolonged period. Functional Threshold Power and Critical Power measure slightly different things. The emphasis of FTP is on the maximum power sustainable for one hour, whereas CP is the power theoretically sustainable indefinitely. So CP should be lower than FTP.

Strava allows you to set your Functional Threshold Power under your personal performance settings. The problem is that if Strava’s Weighted Average Power is based on Skiba’s xPower, it would be more consistent to use Critical Power, as I did in the table above. This is important because this figure is used to calculate Intensity and Training Load. If you follow Strava’s suggestion of using FTP, subsequent calculations will underestimate your Training Load,  which, in turn, impacts your Fitness & Freshness curves.

Intensity

The idea of intensity is to measure severity of a ride, taking account of the rider’s individual capabilities.  Intensity is defined as the ratio of the power equivalent physiological cost of the ride relative to your sustainable power. For Coggan, the Intensity Factor is NP/FTP; for Skiba the Relative Intensity is xPower/CP; and for Strava the Intensity is Weighted Average Power/FTP.

Training Load

An overall assessment of a ride needs to take account of the intensity and the duration of a ride. It is helpful to standardise this for an individual rider, by comparing it against a benchmark, such as an all-out one hour effort.

Coggan proposes the Training Stress Score that takes the ratio the work done at Normalised Power, scaled by the Intensity Factor squared, relative to one hour’s work at FTP. Skiba defines the BikeScore as the ratio the work done at xPower, scaled by the Relative Intensity squared, relative to one hour’s work at CP. And finally, Strava’s Training Load takes the ratio the work done at Weighted Average Power, scaled by Intensity squared, relative to one hour’s work at FTP.

Note that for my hill reps ride, the BikeScore of 101, was considerably lower than the TSS of 117. Although my estimated CP is 12W lower than my FTP, xPower was 30W lower than NP. Using my CP as my Strava FTP, Strava’s Training Load is the same as Skiba’s Bike Score (otherwise I’d get 93).

Suffer Score

Strava’s Suffer Score was inspired by Eric Banister’s training-impulse (TRIMP) concept. It is derived from the amount of time spent in each heart rate zone, so it can be calculated for multiple sports. You can set your Strava heart rate zones in your personal settings, or just leave then on default, based on your maximum heart rate.

A non-linear relationship is assumed between effort and heart rate zone. Each minute in Zone 1, Endurance, is worth 12 seconds; Moderate Zone 2 minutes are worth 24 seconds; Zone 3 Tempo minutes are worth 45 seconds; Zone 4 Threshold minutes are worth 100 seconds; and Anaerobic Zone 5 minutes are worth 120 seconds. The Suffer Score is the weighted sum of minutes in each zone.

The next blog will comment on the Fitness & Freshness charts available on Strava Premium.

Which Strava KOMs will fall in the Tour of Flanders?

This series looking at Strava leaderboards now turns to the action in Belgium, where the spring classics season is under way. Greg Van Avermaet, Philipe Gilbert, Michal Kwiatkowski and Peter Sagan are among the riders in top form ahead of the Tour of Flanders, not forgetting former winners Tom Boonen, Alexander Kristoff and Stijn Devolder. This year’s race includes 18 climbs, finishing with a loop that takes in six famous ascents in the last 50km. Will the pros to be setting KOMs on these Hellingens?
Making the top 10 on any leaderboard, towards the end of a 260km race, sounds like a tall order. KOMs are more likely to fall on longer faster climbs where riders can benefit from drafting in a group. In fact the riders will be climbing the Oude-Kwaremont three times and the Paterberg twice, so the top times are more at risk on those two, if someone decides to make a strong attack. The weather forecast is good: sunny, about 16°C, with a light breeze from the WNW. The wind will be against the riders on the Taaienberg, but it will provide a small benefit on the other final hills, which happen to be ridden in directions between East and South.

Koppenberg

Surface: Cobbles, Distance: 444m, Avg Grade: 14.3%, Elevation Gain: 64m, Bearing: 104°

Rank Name Time Date Race
1 Reinardt Janse van Rensburg 00:01:27 19-Feb-14
2 Joris Van Der Auwera 00:01:28 01-Jan-10
2 gijsade holstege 00:01:28 01-Jan-10
2 Dries Devenyns 00:01:28 27-Nov-15
5 Cameron Bayly 00:01:30 06-Sep-15
6 Dylan Kennett 00:01:32 26-Jun-15
7 FOCUS Rides 00:01:34 01-Jan-10
7 Korneel De Viaene 00:01:34 06-Aug-15
7 Arjen Palstra 00:01:34 02-Apr-16
7 Korneel De Viaene 00:01:34 06-Aug-15

Pro rider van Rensburg holds the KOM up the Koppenberg, set on a pre-race recce. Dries Devenyns is not far behind, but none of the top ten times appear to have been set in races. Although there will be a weak tailwind, it seems unlikely that a new record will be set in this year’s Tour of Flanders.

Steenbeekdries

Surface: Cobbles, Distance: 724m, Avg Grade: 2.8%, Elevation Gain: 24m, Bearing: 121°

Rank Name Time Date Race
1 Niki Terpstra Racing 00:01:22 01-Apr-15
2 Jasper Stuyven 00:01:25 06-Apr-13 Flanders U23
2 Lawson Craddock 00:01:25 06-Apr-13 Flanders U23
4 Michal Kwiatkowski 00:01:26 01-Apr-16
5 Jered Gruber 00:01:27 06-Apr-12
5 Walter Eikelenboom 00:01:27 04-Aug-15
7 Pierre-Henri LECUISINIER 00:01:28 06-Apr-13 Flanders U23
7 Marcus Burghardt 00:01:28 02-Apr-15 Three Days of De Panne
9 Michael Schär 00:01:29 02-Apr-15 Three Days of De Panne
10 Stijn Steels 00:01:30 29-Mar-17

Two riders made the top ten in the 2015 edition of the Three Days of De Panne and three others in the Flanders Under 23 race in 2013. We can also see quick times in recce rides by Terpstra in 2015, Kwiatkowski, last year, and Steels this week. There’s a chance this KOM could go on Sunday.

Taaienberg

Surface: Cobbles, Distance: 639m, Avg Grade: 7.8%, Elevation Gain: 46m, Bearing: 262°

Rank Name Time Date Race
1 Daniel Oss 00:01:12 25-Mar-16 E3 Harelbeke
2 Jasper Stuyven 00:01:13 25-Feb-17 Omloop Het Nieuwsblad
3 AlliGator Junior 00:01:14 06-Mar-13
3 Edward Theuns 00:01:14 25-Feb-17 Omloop Het Nieuwsblad
3 Greg Van Avermaet 00:01:14 24-Mar-17 E3 Harelbeke
6 Wesley Van Dyck 2090874575184 00:01:15 28-Mar-17 Three Days of De Panne
7 Arnaud Demare 00:01:16 22-Mar-17 Dwars door Vlaanderen
7 Johnny Cecotto 00:01:16 22-Mar-17 Dwars door Vlaanderen
9 Jarl . 00:01:17 18-Mar-14
9 Bryan Coquard 00:01:17 24-Mar-17 E3 Harelbeke

This is another segment that is dominated by the pros and tends to be smashed in races.  The problem is that there will be a slight headwind, so this KOM will probably hold on Sunday.

Kruisberg (Oudestraat)

Surface: Asphalt, Distance: 1813m, Avg Grade: 4.9%, Elevation Gain: 89m, Bearing: 142°

Rank Name Time Date Race
1 Daniel Lloyd 00:04:03 03-Apr-11 Tour of Flanders
2 Cor ~~ 00:04:05 03-Apr-11 Tour of Flanders
3 davide COM 00:04:06 03-Apr-11 Tour of Flanders
4 Jeremy Cameron Ⓥ 00:04:24 29-Jun-16
5 Pascal Eenkhoorn 00:05:00 13-Mar-16
6 Pieterjan Spyns 00:05:02 06-Jul-15
7 dylan de kok 00:05:03 21-Feb-14
8 Eloy Raas 00:05:04 21-Feb-14
9 Lenard Maes 00:05:06 21-Jul-15
10 kobe vdv 00:05:09 30-Mar-17

The KOM is held by GCN‘s Daniel Lloyd, set in the Tour of Flanders in 2011, in very similar weather conditions. The three leading times stand a long way ahead of the rest. It will be very interesting to see how the current pros perform on this climb. Daniel’s time could be at risk.

Oude-Kwaremont

Surface: Cobbles, Distance: 2509m, Avg Grade: 3.6%, Elevation Gain: 91m, Bearing: 163°

Rank Name Time Date Race
1 Niki Terpstra Racing 00:04:55 25-Mar-16 E3 Harelbeke
2 Daniel Oss 00:04:58 25-Mar-16 E3 Harelbeke
3 Tiesj Benoot 00:04:59 25-Mar-16 E3 Harelbeke
4 Nikolas Maes 00:05:01 23-Mar-16 Dwars door Vlaanderen
5 Michal Kwiatkowski 00:05:02 25-Mar-16 E3 Harelbeke
6 Scott Thwaites 00:05:04 23-Mar-16 Dwars door Vlaanderen
7 Greg Van Avermaet 00:05:06 28-Feb-16 Kuurne–Brussels–Kuurne
8 Oliver Naesen 00:05:07 24-Mar-17 E3 Harelbeke
9 Stijn Vandenbergh Racing 00:05:08 28-Mar-14 E3 Harelbeke
10 Antoine Duchesne 00:05:10 28-Feb-16 Kuurne–Brussels–Kuurne

The leaderboard of segment is packed with pro racing performances, led once again by Niki Terpstra. With the last ascent coming at a crucial time in this year’s Tour of Flanders, the KOM could fall again.

Paterberg

Surface: Cobbles, Distance: 358m, Avg Grade: 11.7%, Elevation Gain: 42m, Bearing: 96°

Rank Name Time Date Race
1 Eli Iserbyt 00:00:53 27-Jul-16
2 Dries Devenyns 00:00:54 19-Feb-14
2 mathias Declerck 00:00:54 01-Sep-16
4 Jarl . 00:00:55 23-Mar-14
5 Pascal Eenkhoorn 00:00:56 04-May-16
6 Joeri Calleeuw 00:00:57 24-Feb-14
6 Frederik Vandewiele 00:00:57 19-Mar-14
6 Antoine Loy 00:00:57 18-Jun-14
6 Aaron Midgley 00:00:57 20-Aug-14
6 Merten De Wever 00:00:57 06-May-15

This short, steep climb seems to be the target of specific KOM hunters. None of the top ten times were set in the big races. Although this will be the final place to attack in this year’s race, the riders will be fatigued by 247km of tough roads. The top time is likely to hold firm, especially if barriers are used to block smoother edges of the road.

Conclusion

KOMs to hold: Paterberg, Koppenberg, Taaienberg

KOMs at risk: Kruisberg, Oude-Kwaremont, Steenbeekdries

Watch out Dan!

Pro Cyclist KOMs on Strava

This series has explored what it takes to get a KOM on Strava, but what about the pros? Don’t they come home with a sackful of KOMs after every training ride? Which pro rider tops the most Strava leaderboards?

You can follow over a thousand pro athletes on Strava. These include runners, triathletes, mountain bikers and professional cyclists. Although you will not find Peter Sagan, Chris Froome, Nairo Quintana or Alberto Contador  (you can ignore all the fake Strava ids with these names), there is a good selection of UCI team riders. There are also riders who do not claim Strava pro status, like some guy called Phil who recently went out for an afternoon ride.

Some pros upload just a limited number of rides, for example, Marianne Vos only has 243 rides on Strava, with nothing new since December. Other riders, such as Ian Stannard, upload their rides, but withhold their (monstrously high) power data. Nevertheless, many pro riders are more open about making their data available on Strava, including power. Take a look at the Col d’Eze segment on the final stage of Paris Nice. The little lightning bolt symbol indicates that the rider was using a power meter, but rather confusingly, some pro riders (Team Sky) are able to hide their average power for the ride, in which case the figure is a Strava estimate. But you can find the real number by highlighting the segment in the analysis view of the ride.

This review considers over 200 active professional road cyclists who are on Strava. The riders with the highest number of KOMs need to have uploaded a lot fast rides, in regions where many segments have been recorded. Here are the current top 10 pro riders from the sample.

Rank KOMs Name Team
1 1907 Laurens ten Dam Team Sunweb
2 1381 Elisa Longo Borghini Wiggle Honda
3 1296 Annemiek van Vleuten Orica AIS
4 1230 Niki Terpstra Racing Quick-Step Floors
5 1162 James Gullen JLT Condor
6 1070 Thibaut Pinot FDJ
7 1035 Dan Evans Cannodale-Drapac Pro Cycling Team
8 978 Romain Bardet AG2R
9 864 Joe Dombrowski Cannodale-Drapac Pro Cycling Team
10 852 Dani King Cylance

A bit further down the list, Michal Kwiatkowski has 559 KOMs, including eight that he picked up in his Milan San Remo victory. After riding the first 140km at a relatively easy 35kph and an average power of just 124W, he upped the effort to traverse the Passo del Turchino. His power and heart rate rose progressively all the way to the Cipressa, from which point he earned a KOM for the segment to the finish. He claimed four KOMs as he followed Peter Sagan’s dramatic attack on the Poggio, though these would have undoubtably been Sagan’s, if he’d put his data on Strava. Viewing the ride analysis, we see that after over seven hours of riding, Michal ascended the 3.6km 4% climb at 37kph, generating 443W (about 6.5 W/kg) for 5 minutes and 47 seconds, rather than the 536W estimated on the leaderboard. He peaked at over 900W near the summit as he an Alaphilippe desperately fought to get onto Sagan’s wheel.Lauren ten Dam has the most KOMs by a long way, though he does match Maryka Sennema’s haul of QOMs. Interestingly there are three women in the top ten, in spite of the fact that most of the riders in the sample were men. It is no surprise to see Elisa Longo Borghini and Annemiek van Vleuten at the head of the women’s rankings. Niki Terpstra follows his Dutch compatriot, while James Gullen is the leading Brit, followed by Dan Evans representing Wales alongside Dani King. Thibaut Pinot and Romain Bardet are the kings of the French mountains. Nice-based American rider Joe Dombrowski also makes the top ten.

The next blog will explore some more feats of the professionals.