Active Inference is a fascinating and ambitious book. It describes a very general normative approach to understanding the mind, brain and behaviour, hinting at potential applications in machine learning and the social sciences. The authors argue that the ways in which living beings interact with the environment can be modelled in terms of something called the free energy principle.
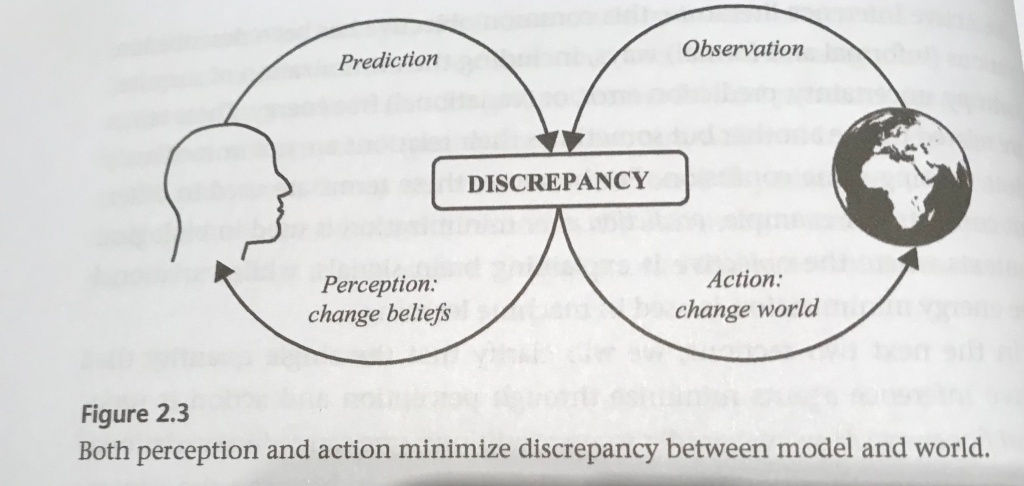
Active Inference builds on the concept of a Bayesian Brain. This is the idea that our brains continually refine an internal model of the external world, acting as probabilistic inference machines. The internal generative model continually predicts the state of the environment and compares its predictions with the inputs of sensory organs. When a discrepancy occurs, the brain updates its model. This is called perception.
But Active Inference goes further my recognising that living things can interact with their environments. Therefore an alternative way to deal with a discrepancy versus expectations is to do something that modifies the world. This is called action.
Variational Free Energy
Active Inference, Parr, Pezzulo, Friston
Either you change your beliefs to match the world or you change the world to match your beliefs. Active Inference makes this trade off by minimising variational free energy, which improves the match between an organism’s internal model and the external world.
The theory is expressed in elegant mathematical terms that lend themselves to systematic analysis. Minimising variational free energy can be considered in terms of finding a maximum entropy distribution, minimising complexity or reducing the divergence between the internal model and the actual posterior distribution.
Expected free energy
Longer term planning is handled in terms of expected free energy. This is where the consequences of future sequences of actions (policies) are evaluated by predicting the outcomes at each stage. The expected free energy of each policy is converted into a score, with the highest score determining the policy the organism expects to pursue. The process of selecting policies that improve the match with the priors pertaining to favoured states is called learning.
Planning is cast in terms of Bayesian inference. Once again the algebraic framework lends itself to a range of interpretations. For example, it automatically trades off information gain (exploration) against pragmatic value (exploitation). This contrasts with reinforcement learning, which handles the issue more heuristically, by trial and error, combined with the notion of a reward.
Applications
The book describes applications in neurobiology, learning and perception. Although readers are encouraged to apply the ideas to new areas, a full understanding of the subject demands the dedication to battle through some heavy duty mathematical appendices, covering Bayesian inference, partially observed Markov Decision Processes and variational calculus.
Nevertheless the book is filled with thought provoking ideas about how living things thrive in the face of the second law of thermodynamics.
Last time I tried to predict a race, I trained up a neural network on past race results, ahead of the World Championships in Harrogate. The model backed Sam Bennett, but it did not take account of the weather conditions, which turned out to be terrible. Fortunately the forecast looks good for tomorrow’s Milan Sanremo.
This time I have tried using a Random Forest, based on the results of the UCI races that took place in 2020 and so far in 2021. The model took account of each rider’s past results, team, height and weight, together with key statistics about each race, including date, distance, average speed and type of parcours.
One of the nice things about this type of model is that it is possible to see how the factors contribute to the overall predictions. The following waterfall chart explains why the model uncontroversially has Wout van Aert as the favourite.
Breakdown of prediction for Wout van Aert
The largest positive contribution comes from being Wout van Aert. This is because he has a lot of good results. His height and weight favour Milan Sanremo. He also has a strong positive coming from his team. This distance and race type make further positive contributions.
We can contrast this with the model’s prediction for Mathieu van der Poel, who is ranked 9th.
Breakdown of prediction for Mathieu van der Poel
We see a positive personal contribution from being van der Poel, but having raced fewer UCI events, he has less of a strong set of results than van Aert. According to the model the Alpecin Fenix team contribution is not a strong as Jumbo Visma, but the long distance of the race works in favour of the Dutchman. The day of year gives a small negative contribution, suggesting that his road results have been stronger later in the year, but this could be due to last year’s unusual timing of races.
Each of the other riders in the model’s top 10 is in with a shout.
It’s taken me all afternoon to set up this model, so this is just a short post.
Post race comment
Where was Jasper Stuyven?
Like Mads Pedersen in Harrogate back in 2019, Jasper Stuyven was this year’s surprise winner in Sanremo. So what had the model expected for him? Scrolling down the list of predictions, Stuyven was ranked 39th.
Breakdown of prediction for Jasper Stuyven
His individual rider prediction was negative, perhaps because he has not had many good results so far this year, though he did win Omloop Het Nieuwsblad last year and had several top 10 finishes. The model assessed that his greatest advantage came from the length of the race, suggesting that he tends to do well over greater distances.
The nice thing about this approach is that that it identifies factors that are relevant to particular riders, in a quantitative fashion. This helps to overcome personal biases and the human tendency to overweight and project forward what has happened most recently.
An attractive aspect of hexagonal patterns is that they can repeat in interesting ways across a cycling jersey. This is partly due to the fact that a hexagon can be divided up into three equal lozenge shapes, as seen near the neck of the top right jersey. These shapes can be combined in imaginative ways, as displayed in the lower two examples.
This three-way division of a hexagon can create a 3D optical illusion called a “Necker cube”, which can appear to flip from convex to concave and back again. The orange patch can appear to be the top of a cube viewed from above or the ceiling in a corner, viewed from below. See if this happens if you stare at the image below.
Looking down on a cube or up into the corner of a room?
Spoiler alert: from here things gets a bit mathematical
Tessellations
A tessellation, or tiling, is a way of covering a plane with polygons of various types. Tessellations have many interesting mathematical properties relating to their symmetries. It turns out that there are exactly 17 types of periodic patterns. Roger Penrose, who was awarded the 2020 Nobel Prize in Physics for his work on the formation of black holes, discovered many interesting aperiodic tilings, such as the Penrose tiling.
While some people were munching on mince pies before Christmas, I watched a thought-provoking video on a related topic, released by the Mathologer, Burkard Polster. He begins by discussing ways of tiling various shapes with dominoes and goes on describe something called the Arctic Circle Theorem. Around the middle of the video, he shifts to tiling hexagon shapes with lozenges, resulting in images with the weird 3D flipping effect described above. This prompted me to spend rather a lot of time writing Python code to explore this topic.
After much experimentation, I created some code that would generate random tilings by stochastically flipping hexagons. Colouring the lozenges according to their orientation resulted in some really interesting 3D effects.
Algorithm flips a random hexagon to create a new tiling.
Neckered
The video shows random tilings of a hexagonal area. These end up looking like a collection of 3D towers with orange tops. But if you focus on a particular cube and tilt your screen backwards, the whole image can flip, Necker-style into an inverted version where the floor becomes the ceiling and the orange segments push downwards.
I used my code to create random tilings of much bigger hexagons. It turned out that plotting the image on every iteration was taking a ridiculous amount of time. Suspending plotting until the end resulted in the code running 10,000 time faster! This allowed me to run 50 million iterations for a hexagon with 32 lozenges on each size, resulting in the fabled Arctic Circle promised by the eponymous theorem. The central area is chaotic, but the colours freeze into opposite solid patches of orange, blue and grey outside the circumference of a large inscribed circle.
Arctic Circle emerged on a hexagon of side 32 after 50 million iterations
Why does the Arctic Circle emerge?
There are two intuitive ways to understand why this happens. Firstly, if you consider the pattern as representing towers with orange tops, then every tower must be taller than the three towers in front of it. So if you try to add or remove a brick randomly, the towers at the back are more likely to become taller, while those near the front tend to become shorter.
Two examples of paths from left to right
The second way to think about it is that, if you look carefully, there is a unique path from each of the lozenges on the left hand vertical side to the corresponding lozenge on the right hand vertical side. At every step, each path either goes up (blue) or down (grey). The gaps between the various paths are orange. Each step of the algorithm flips between up-down and down-up steps on a particular path. On the large hexagon, the only way to prevent the topmost cell from being orange is for the highest path to go up (and remain blue) 32 times in a row. This is very unlikely when flips are random, though it can happen more often on a smaller size-6 hexagon like the one shown in the example.
Resources
A Jupyter notebook demonstrating the approach and Python code for running longer simulations are available on this GitHub page.
Back to cycling jerseys
The Dutch company DSM is proudly sponsoring a professional cycling team in 2021. And a hexagon lies at the heart of the DSM logo, that will appear on the team jerseys.
The COVID-19 pandemic has further exposed the weakness of the professional cycling business model. The competition between the teams for funding from a limited number of sponsors undermines the stability of the profession. With marketing budgets under strain, more teams are likely to face difficulties, in spite of the great advertising and publicity that the sport provides. Douglas Ryder is fighting an uphill struggle trying to keep his team alive after the withdrawal of NTT as a lead sponsor. One aspect of stability is financial, but another measure is the level of transfers between teams.
The composition of some teams is more stable than others. This is illustrated by analysing the history of riders’ careers, which is available on ProCyclingStats. The following chart is a network of the transfers between teams in the last year, where the yellow nodes are 2020 teams and the purple ones are 2019. The width of the edges indicates how many riders transferred between the teams, with the thick green lines representing the bulk of the riders who stuck with the same team. The blue labels give the initials of the official name of each team, such as M-S (Mitchelton-Scott), MT (Movistar Team), T-S (Trek-Segafredo) and TS (Team Sunweb). Riders who switched teams are labelled in red.
Although there is a Dutch/German grouping on the lower right, the main structure is from the outside towards the centre of the network.
The two World Tour outliers were Mitchelton-Scott (M-S) and Groupama FDJ (GF), who retained virtually all their riders from 2019. Moving closer in, a group of teams lies around the edge of the central mass, where a few transfers occurred. Moving anti-clockwise we see CCC Team (CT), Astana Pro Team (APT), Trek-Segafredo (T-S), AG2R Le Mondial (ALM), Circus-Wanty Gobert (C-WG), Team Jumbo Visma (TJV), Bora-Hansgrohe (B-H) and EF Pro Cycling (EPC).
A few of the top riders have contracts for next year showing up on ProCyclingStats. So far 2020/2021 looks like the network below. Many riders are renewing with their existing teams, indicated by the broad green lines. But some big names are changing teams, including Chris Froome, Richie Porte, Laurens De Plus, Sam Oomen, Romain Bardet and Wilco Keldeman, Bob Jungels and Lilian Calmejane.
What about networks of riders?
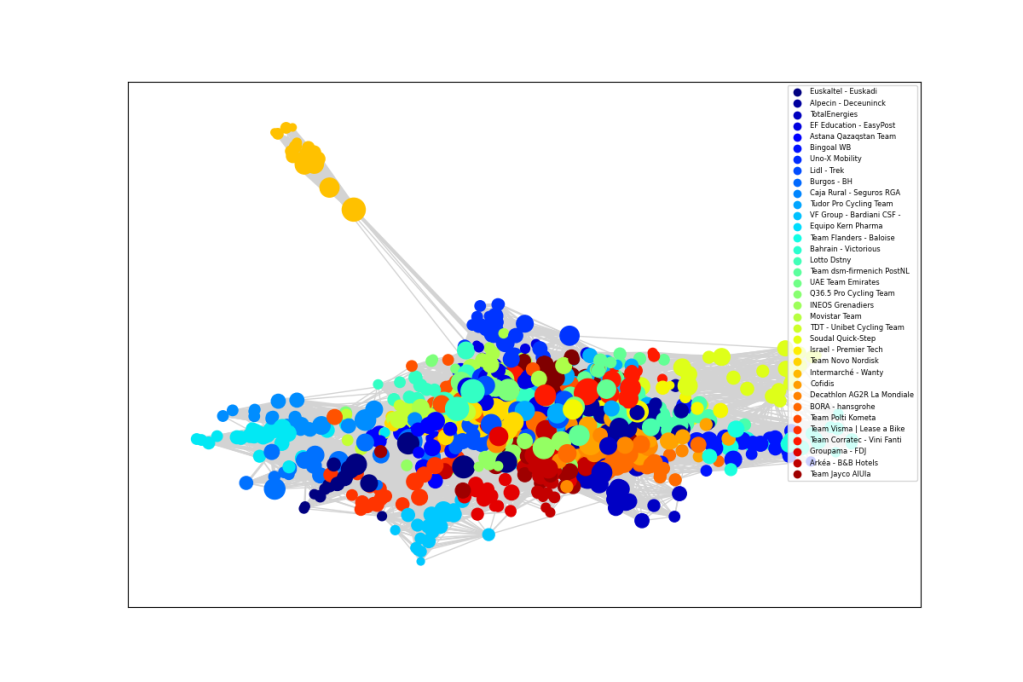
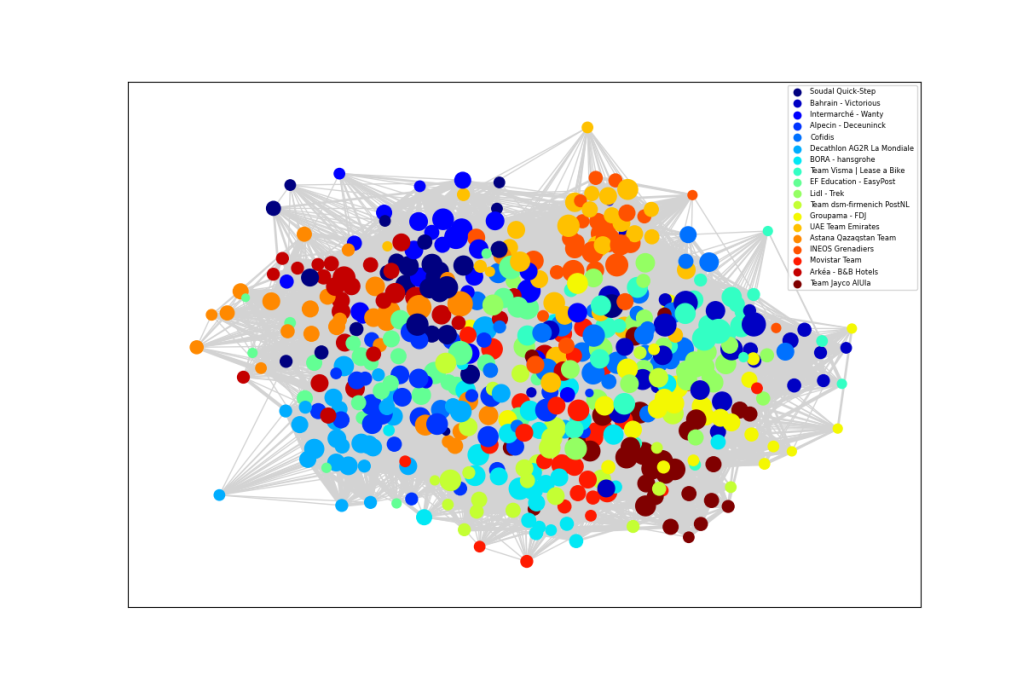
My original thought when starting this analysis was that over their careers, certain riders must have been team mates with most of the riders in today’s peloton, so who is the most connected? Unfortunately this turned out to be ridiculously complicated, as shown in the image below, where nodes are riders with links if they were ever teammates and the colours represent the current teams. The highest ranked rider in each team is shown in red.
It is hard to make much sense of this, other than to note that those with shorter careers in the same team are near the edge and that Philippe Gilbert is close to the centre. Out of interest, the rider around 9 o’clock linking Bora and Jumbo Visma is Christoph Pfingsten, who moved this year. At least we can conclude that professional cyclists are well-connected.
Which Lord of the Rings characters do they look like? Ask an AI.
After building an app that uses deep learning to recognise Lord of the Rings characters, I had a bit of fun feeding in pictures of professional cyclists. This blog explains how the app works. If you just want to try it out yourself, you can find it here, but note that may need to be fairly patient, because it can take up to 5 minutes to fire up for the first time… it does start eventually.
Identifying wizards, hobbits and elves
The code that performs this task was based on the latest version of the excellent fast.ai course Practical Deep Learning for Coders. If you have done bit of programming in Python, you can build something like this yourself after just a few lessons.
The course sets out to defy some myths about deep learning. You don’t need to have a PhD in computer science – the fastai library is brilliantly designed and easy to use. Python is the language of choice for much of data science and the course runs in Jupyter notebooks.
You don’t need petabytes of data – I used fewer than 150 sample images of each character, downloaded using the Bing Image Search API. It is also straightforward to download publicly available neural networks within the fastai framework. These have been pre-trained to recognise a broad range of objects. Then it is relatively quick to fine-tune the parameters to achieve a specific task, such as recognising about 20 different Tolkien characters.
You don’t need expensive resources to build your models – I trained my neural network in just a few minutes, using a free GPU available on Google’s Colaboratory platform. After transferring the essential files to a github repository, I deployed the app at no cost, using Binder.
Thanks to the guidance provided by fastai, the whole process was quick and straightforward to do. In fact, by far the most time consuming task was cleaning up the data set of downloaded images. But there was a trick for doing this. First you train your network on whatever images come up in an initial search, until it achieves a reasonable degree of accuracy. Then take a look at the images that the model finds the most difficult to classify. I found that these tended to be pictures of lego figures or cartoon images. With the help of a fastai tool, it was simple to remove irrelevant images from the training and validation sets.
After a couple of iterations, I had a clean dataset and a great model, giving about 70% accuracy, which as good enough my purposes. Some examples are shown in the left column at the top of this blog.
The model’s performance was remarkably similar to my own. While Gollum is easy to identify, the wizard Saruman can be mistaken for Gandalf, Boromir looks a bit like Faramir and the hobbits Pippin and Merry can be confused.
Applications outside Middle Earth
One of the important limits of these types of image recognition models is that even if they work well in the domain in which they have been trained, they cannot be expected do a good job on totally different images. Nevertheless, I thought it would be amusing to supply the pictures of professional cyclists, particularly given the current vogue for growing facial hair.
My model was 87% sure that Peter Sagan was Boromir, but only 81.5% confident in the picture of Sean Bean. It was even more certain that Daniel Oss played the role of Faramir. Geraint Thomas was predicted to be Frodo Baggins, but with much lower confidence. I wondered for a while with Tadej Pogacar should be Legolas, but perhaps the model interpreted his outstretched arms as those of an archer.
I hoped that a heavily bearded Bradley Wiggins might come out as Gimli, but that did not not seem to work. Nevertheless it was entertaining to upload photographs of friends and family. With apologies for any waiting times to get to it running, you can try it here.
A strategy for finding people infected with SARS-CoV-2: optimizing pooled testing at low prevalence, Mutesa et al
In previous blogs, I described how mathematical modelling can help understand the spread of the COVID-19 epidemics and provide privacy-preserving contact tracing. Looking forward at how the world will have to deal with COVID-19 in the coming months, it is likely that a significant percentage of the population will need to be tested multiple times. In a recent BBC science podcast, Neil Turok, Leon Mutesa and Wilfred Ndifo describe their highly efficient method of implementing large-scale testing that takes advantage of pooling samples. This is helping African governments save millions on the cost of testing. I offer an outline of their innovative approach, which is described in more detail in a paper published on arxiv.org.
The need for large-scale testing
The roll-out of antigen testing in some countries, like the US and the UK, has been painfully slow. Some suggest that the US may need to carry out between 400,00 and 900,000 tests a day in order to get a grip on the epidemic. When antigen tests cost 30-50 US dollars (or 24-40 UK pounds), this could be very expensive. However, as long as a relatively small percentage of the population is infected, running a separate test for everyone would be extremely inefficient compared with approaches that pool samples.
Pooling offers a huge advantage, because a negative test for a pooled sample of 100 swabs, would clear 100 people with a single test. The optimal size of the pools depends on the level of incidence of the disease: larger pools can be used for lower incidence.
The concept of pooling dates back to the work of Dorfman in 1943. His method was to choose an optimal pool size and perform a test on each pooled sample. A negative result for a pool clears all the samples contained in it. Then the infected individuals are found by testing every sample in the the positive pools. Mutesa and Ndifo’s hypercube method is more efficient, because, rather than testing everyone in an infected pool, you test carefully-selected sub-pools.
The idea is to imagine that all the samples in a pool lie on a multidimensional lattice in the form of a hypercube. It turns out that the optimal number of points in each direction is 3. Obviously it is hard to visualise high dimensions, but in 3-D, you have 27 samples arranged on a 3x3x3 grid forming a cube. The trick to identifying individual infected samples is to create sub-pools by taking slices through the lattice. In the diagram above, there are 3 red slices, 3 green and 3 blue, each containing 9 samples.
Consider, for simplicity, only one infected person out of the 27. Testing the 9 pools represented by the coloured slices will result in exactly 3 positive results, representing the intersection of the three planes passing through the infected sample. This uniquely identifies the positive individual with just 9 tests, whereas Dorfman would have set out to test all 27, finding the positive, on average after doing half of these.
Slicing a hypercube
Although you can optimise the pool size to ensure that the expected number of positives in any pool is manageable, in practice you won’t know how many infected samples are contained in any particular pool. The hypercube method deals with this by noting that a slice through a D-dimensional hypercube is itself a hypercube of dimension D-1, so the method can be applied recursively.
The other big advantage is that the approach is massively parallel, allowing positives to be identified quickly, relative to the speed of spread of the pandemic. About 3 rounds of PCR tests can be completed in a day. Algorithms that further reduce the total number of tests towards the information theoretical limit, such as binary search, require tests to be performed sequentially, which takes longer than doing more tests in parallel.
In order to make sure I really understood what is going on, I wrote some Python code to implement and validate the hypercube algorithm. In principle, it was extremely simple, but dealing with low probability edge cases, where multiple positive samples happen to fall into the same slice turned out to be a bit messy. However, in simulations, all infected samples were identified with no false positives nor false negatives. The number of tests was very much in line with the theoretical value.
Huge cost savings
My Python program estimates the cost savings of implementing the hypercube algorithm versus testing every sample individually. The bottom line is that the if the US government needed to test 900,000 people and the background level of infection is 1%, the algorithm would find all infected individuals with around 110,000 tests or 12% of the total samples. At $40 a test, this would be a cost saving of over $30million per day versus testing everyone individually. Equivalent calculations for the UK government to test 200,000 people would offer savings of around £5million pounds a day.
It is great to see leading edge science being developed in Africa. Cost conscious governments, for example in Rwanda, are implementing the strategy. Western governments lag behind, delayed by anecdotal comments from UK officials who worry that the approach is “too mathematical”, as if this is somehow a vice rather than a virtue.
As the initial global wave of COVID-19 infections is brought under control, the world is moving into a phase of extensive testing, tracking and tracing, until a vaccine can be found. The preservation of personal privacy must be paramount in these initiatives.
The UK government’s target of performing 100,000 tests a day by the end of April 2020 provided a fine example of Goodhart’s law: “When a measure becomes a target, it ceases to be a good measure”. One tragic consequence was the willingness, even encouragement, to define just about anything as a “completed test”, including the action of simply dispatching a kit by post. This has discouraged the distinguish between different types of test: antigen or antibody, nasal swab or blood test, pin-prick or venous sample, laboratory analysis or on-the-spot result.
For those who suspect they might have been exposed to COVID-19, an antibody test is the most useful. Although there has not been time to gather sufficient information to be absolutely sure, the detection of antibodies in the blood should provide immunity from infection, at least in the short term, unless the virus mutates sufficiently to bypass the immune response. Private tests are available from providers, such as Forth, where reliable results of IgG antibodies are provided by laboratory tests performed using the Abbot Architect method.
A second area where the UK government seems to be going wrong is in hiring thousands of people to carry out intrusive tracking and tracing. Not only is this hugely inefficient, it is also a massive unnecessary invasion of personal privacy. That a data leak occurred before it even started hardly inspires confidence.
Privacy Preserving Contact Tracing
A team of epidemiologist and cryptographers called DP-3T has released open source software that makes use of Bluetooth messages exchanged between mobile phones to track and trace COVID-19 infections entirely anonymously. It does not require users to surrender any personal information or location data. The approach is the basis for the technology announced jointly by Apple and Google.
The method is explained very nicely in this video 3Blue1Brown or in comic form by Nicky Case. This is a summary of how it works. Once you download a privacy preserving app onto your phone, it transmits random numbers over Bluetooth, at regular time intervals, and simultaneously listens for the random numbers of other users. Since the numbers are random, they contain no information about the you. Your phone locally maintains a list of your transmitted random numbers. It also stores locally a list of all numbers received, possibly including a timestamp and the Bluetooth signal strength, which gives some information about the proximity of the other user. Items older than, say, 14 days can be deleted from both lists.
If a person falls ill and tests positive for COVID-19 antigens, that person can voluntarily, with the permission of a healthcare professional, anonymously upload the list of transmitted random numbers to a central database. The phone app of every user periodically checks this database against its local list of received messages. If a match is detected, the app can identify the date, time and duration of contact, along with an estimate of proximity. This allows the app to advise a user to “self-isolate” for an appropriate period. This matching can all be done locally on the phone.
If set up appropriately, neither Google nor Apple nor any government body would be able to identify any particular individual. Privacy is preserved. No human trackers or tracers are required. No ankle bracelets or police guards are necessary. The system is entirely voluntary, but if sufficient users join up, say, 60% of those susceptible, it can still have a significant impact in controlling the spread of the virus. This is the correct way forward for a free and democratic society.
Since my blog about Strava Fitness and Freshness has been very popular, I thought it would be interesting to demonstrate a simple model that can help you use these metrics to improve your cycling performance.
As a quick reminder, Strava’s Fitness measure is an exponentially weighted average of your daily Training Load, over the last six weeks or so. Assuming you are using a power meter, it is important to use a correctly calibrated estimate of your Functional Threshold Power (FTP) to obtain an accurate value for the Training Load of each ride. This ensures that a maximal-effort one hour ride gives a value of 100. The exponential weighting means that the benefit of a training ride decays over time, so a hard ride last week has less impact on today’s Fitness than a hard ride yesterday. In fact, if you do nothing, Fitness decays at a rate of about 2.5% per day.
Although Fitness is a time-weighted average, a simple rule of thumb is that your Fitness Score equates to your average daily Training Load over the last month or so. For example, a Fitness level of 50 is consistent with an average daily Training Load (including rest days) of 50. It may be easier to think of this in terms of a total Training Load of 350 per week, which might include a longer ride of 150, a medium ride of 100 and a couple of shorter rides with a Training Load of 50.
How to get fitter
The way to get fitter is to increase your Training Load. This can be achieved by riding at a higher intensity, increasing the duration of rides or including extra rides. But this needs to be done in a structured way in order be effective. Periodisation is an approach that has been tried and tested over the years. A four-week cycle would typically include three weekly blocks of higher training load, followed by an easier week of recovery. Strava’s Fitness score provides a measure of your progress.
Modelling Fitness and Fatigue
An exponentially weighted moving average is very easy to model, because it evolves like a Markov Process, having the following property, relating to yesterday’s value and today’s Training Load. where is Fitness or Fatigue on day t and for Fitness or for Fatigue
This is why your Fitness falls by about 2.4% and your Fatigue eases by about 13.3% after a rest day. The formula makes it straightforward to predict the impact of a training plan stretching out into the future. It is also possible to determine what Training Load is required to achieve a target level of Fitness improvement of a specific time period.
Ramping up your Fitness
The change in Fitness over the next seven days is called a weekly “ramp”. Aiming for a weekly ramp of 5 would be very ambitious. It turns out that you would need to increase your daily Training Load by 33. That is a substantial extra Training Load of 231 over the next week, particularly because Training Load automatically takes account of a rider’s FTP.
Interestingly, this increase in Training Load is the same, regardless of your starting Fitness. However, stepping up an average Training Load from 30 to 63 per day would require a doubling of work done over the next week, whereas for someone starting at 60, moving up to 93 per day would require a 54% increase in effort for the week.
In both cases, a cyclist would typically require two additional hard training rides, resulting in an accumulation of fatigue, which is picked up by Strava’s Fatigue score. This is a much shorter term moving average of your recent Training Load, over the last week or so. If we assume that you start with a Fatigue score equal to your Fitness score, an increase of 33 in daily Training Load would cause your Fatigue to rise by 21 over the week. If you managed to sustain this over the week, your Form (Fitness minus Fatigue) would fall from zero to -16. Here’s a summary of all the numbers mentioned so far.
Impact of a weekly ramp of 5 on two riders with initial Fitness of 30 and 60
Whilst it might be possible to do this for a week, the regime would be very hard to sustain over a three-week block, particularly because you would be going into the second week with significant accumulated fatigue. Training sessions and race performance tend to be compromised when Form drops below -20. Furthermore, if you have increased your Fitness by 5 over a week, you will need to increase Training Load by another 231 for the following week to continue the same upward trajectory, then increase again for the third week. So we conclude that a weekly ramp of 5 is not sustainable over three weeks. Something of the order of 2 or 3 may be more reasonable.
A steady increase in Fitness
Consider a rider with a Fitness level of 30, who would have a weekly Training Load of around 210 (7 times 30). This might be five weekly commutes and a longer ride on the weekend. A periodised monthly plan could include a ramp of 2, steadily increasing Training Load for three weeks followed by a recovery week of -1, as follows.
Plan of a moderate rider
This gives a net increase in Fitness of 5 over the month. Fatigue has also risen by 5, but since the rider is fitter, Form ends the month at zero, ready to start the next block of training.
To simplify the calculations, I assumed the same Training Load every day in each week. This is unrealistic in practice, because all athletes need a rest day and training needs to mix up the duration and intensity of individual rides. The fine tuning of weekly rides is a subject for another blog.
A tougher training block
A rider engaging in a higher level of training, with a Fitness score of 60, may be able to manage weekly ramps of 3, before the recovery week. The following Training Plan would raise Fitness to 67, with sufficient recovery to bring Form back to positive at the end of the month.
A more ambitious training plan
A general plan
The interesting thing about this analysis is that the outcomes of the plans are independent of a rider’s starting Fitness. This is a consequence of the Markov property. So if we describe the ambitious plan as [3,3,3,-2], a rider will see a Fitness improvement of 7, from whatever initial value prevailed: starting at 30, Fitness would go to 37, while the rider starting at 60 would rise to 67.
Similarly, if Form begins at zero, i.e. the starting values of Fitness and Fatigue are equal, then the [3,3,3,-2] plan will always result in a in a net change of 6 in Fatigue over the four weeks.
In the same way, (assuming initial Form of zero) the moderate plan of [2,2,2,-1] would give any rider a net increase of Fitness and Fatigue of 5.
A couple of years ago I built a model to evaluate how Froome and Dumoulin would have matched up, if they had not avoided racing against each other over the 2017 season. As we approach the 2019 World Championships Road Race in Yorkshire, I have adopted a more sophisticated approach to try to predict the winner of the men’s race. The smart money could be going on Sam Bennett.
Deep learning
With only two races outstanding, most of this year’s UCI world tour results are available. I decided to broaden the data set with 2.HC classification European Tour races, such as the OVO Energy Tour of Britain. In order to help with prediction, I included each rider’s weight and height, as well as some meta-data about each race, such as date, distance, average speed, parcours and type (stage, one-day, GC, etc.).
The key question was what exactly are you trying to predict? The UCI allocates points for race results, using a non-linear scale. For example, Mathieu Van Der Poel was awarded 500 points for winning Amstel Gold, while Simon Clarke won 400 for coming second and Jakob Fuglsang picked up 325 for third place, continuing down to 3 points for coming 60th. I created a target variable called PosX, defined as a negative exponential of the rider’s position in any race, equating to 1.000 for a win, 0.834 for second, 0.695 for third, decaying down to 0.032 for 20th. This has a similar profile to the points scheme, emphasising the top positions, and handles races with different numbers of riders.
A random forest would be a typical choice of model for this kind of data set, which included a mixture of continuous and categorical variables. However, I opted for a neural network, using embeddings to encode the categorical variables, with two hidden layers of 200 and 100 activations. This was very straightforward using the fast.ai library. Training was completed in a handful of seconds on my MacBook Pro, without needing a GPU.
After some experimentation on a subset of the data, it was clear that the model was coming up with good predictions on the validation set and the out-of-sample test set. With a bit more coding, I set up a procedure to load a start list and the meta-data for a future race, in order to predict the result.
Predictions
With the final start list for the World Championships Road Race looking reasonably complete, I was able to generate the predicted top 10. The parcours obviously has an important bearing on who wins a race. With around 3600m of climbing, the course was clearly hilly, though not mountainous. Although the finish was slightly uphill, it was not ridiculously steep, so I decided to classify the parcours as rolling with a flat finish
Position
Rider
Prediction
1
Mathieu Van Der Poel
0.602
2
Alexander Kristoff
0.566
3
Sam Bennett
0.553
4
Peter Sagan
0.540
5
Edvald Boasson Hagen
0.507
6
Greg Van Avermaet
0.500
7
Matteo Trentin
0.434
8
Michael Matthews
0.423
9
Julian Alaphilippe
0.369
10
Mike Teunissen
0.362
It was encouraging to see that the model produced a highly credible list of potential top 10 riders, agreeing with the bookies in rating Mathieu Van Der Poel as the most likely winner. Sagan was ranked slightly below Kristoff and Bennett, who are seen as outsiders by the pundits. The popular choice of Philippe Gilbert did not appear in my top 10 and Alaphilippe was only 9th, in spite of their recent strong performances in the Vuelta and the Tour, respectively. Riders in positions 5 to 10 would all be expected to perform well in the cycling classics, which tend to be long and arduous, like the Yorkshire course.
For me, 25/1 odds on Sam Bennett are attractive. He has a strong group of teammates, in Dan Martin, Eddie Dunbar, Connor Dunne, Ryan Mullen and Rory Townsend, who will work hard to keep him with the lead group in the hillier early part of the race. Then he will then face an extremely strong Belgian team that is likely to play the same game that Deceuninck-QuickStep successfully pulled off in stage 17 of the Vuelta, won by Gilbert. But Bennett was born in Belgium and he was clearly the best sprinter out in Spain. He should be able to handle the rises near the finish.
A similar case can be made for Kristoff, while Matthews and Van Avermaet both had recent wins in Canada. Nevertheless it is hard to look past the three-times winner Peter Sagan, though if Van Der Poel launches one of his explosive finishes, there is no one to stop him pulling on the rainbow jersey.
Appendix
After the race, I checked the predicted position of the eventual winner, Mads Pedersen. He was expected to come 74th. Clearly the bad weather played a role in the result, favouring the larger riders, who were able to keep warmer. The Dane clearly proved to be the strongest rider on the day.
Last year, I experimented with using style transfer to automatically generate images in the style of @grandtourart. More recently I developed a more ambitious version of my rather simple bike identifier. The connection between these two projects is sunflowers. This blog describes how I built a flower identification app.
In the brilliant fast.ai Practical Deep Learning for Coders course, Jeremy Howard recommends downloading a publicly available dataset to improve one’s image categorisation skills. I decided to experiment with the 102 Category Flower Dataset, kindly made available by the Visual Geometry Group at Oxford University. In the original 2008 paper, the researchers used a combination of techniques to segment each image and characterise its features. Taking these as inputs to a Support Vector Machine classifier, their best model achieved an accuracy of 72.8%.
Annoyingly, I could not find a list linking the category numbers to the names of the flowers, so I scraped the page showing sample images and found the images in the labelled data.
Using exactly the same training, validation and test sets, my ResNet34 model quickly achieved an accuracy of 80.0%. I created a new branch of the GitHub repository established for the Bike Image model and linked this to a new web service on my Render account. The huge outperformance of the paper was satisfying, but I was sure that a better result was possible.
The Oxford researchers had divided their set of 8,189 labelled images into a training set and a validation set, each containing 10 examples of the 102 flowers. The remaining 6,149 images were reserved for testing. Why allocate less that a quarter of the data to training/validation? Perhaps this was due to limits on computational resources available at the time. In fact, the training and validation sets were so small that I was able to train the ResNet34 on my MacBook Pro’s CPU, within an acceptable time.
My plan to improve accuracy was to merge the test set into the training set, keeping aside the original validation set of 1,020 images for testing. This expanded training set of 7,261 images immediately failed on my MacBook, so I uploaded my existing model onto my PaperSpace GPU, with amazing results. Within 45 minutes, I had a model with 97.0% accuracy on the held-out test set. I quickly exported the learner and switched the link in the flowers branch of my GitHub repository. The committed changes automatically fed straight through to the web service on Render.
I discovered, when visiting the app on my phone, that selecting an image offers the option to take a photo and upload it directly for identification. Having exhausted the flowers in my garden, I have risked being spotted by neighbours as I furtively lean over their front walls to photograph the plants in their gardens.
Takeaways
It is very efficient to use smaller datasets and low resolution images for initial training. Save the model and then increase resolution. Often you can do this on a local CPU without even paying for access to a GPU. When you have a half decent model, upload it onto a GPU and continue training with the full dataset. Deploying the model as a web service on Render makes the model available to any device, including a mobile phone.
My final model is amazing… and it works for sunflowers.