Generating music videos using Stable Diffusion

Video generated using Stable Diffusion

In my last post I described how to generate a series of images by feeding back the output of a Stable Diffusion image-to-image model as the input for the next image. I have now developed this into a Generative AI pipeline that creates music videos from the lyrics of songs.

Learning to animate

In my earlier blog about dreaming of the Giro, I saved a series of key frames in a GIF, resulting in an attractive stream of images, but the result was rather clunky. The natural next step was to improve the output by inserting frames to smooth out the transitions between the key frames, saving the result as a video in MP4 format, at a rate of 20 frames per second.

I started experimenting with a series of prompts, combined with the styles of different artists. Salvador Dali worked particularly well for dreamy animations of story lines. In the Dali example below, I used “red, magenta, pink” as a negative prompt to stop these colours swamping the image. The Kandinsky and Miro animations became gradually more detailed. I think these effects were a consequence of the repetitive feedback involved in the pipeline. The Arcimboldo portraits go from fish to fruit to flowers.

Demo app

A created a demo app on Hugging Face called AnimateYourDream. In order to get this to work, you need to duplicate it and then run it using a GPU on your Hugging Face account (costing $0.06 per hour). The idea was to try to recreate a dream I’d had the previous night. You can choose the artistic style, select an option to zoom in, enter three guiding prompts with the desired number of frames and choose a negative prompt. The animation process takes 3-5 minutes on a basic GPU.

For example, setting the style as “Dali surrealist”, zooming in, with 5 frames each of “landscape”, “weird animals” and “a castle with weird animals” produced the following animation.

Demo of my AnimateYourDream app on Hugging Face

Music videos

After spending some hours generating animations on a free Google Colab GPU and marvelling over the animations, I found that the images were brought to life by the music I was playing in the background. This triggered the brainwave of using the lyrics of songs as prompts for the Stable Diffusion model.

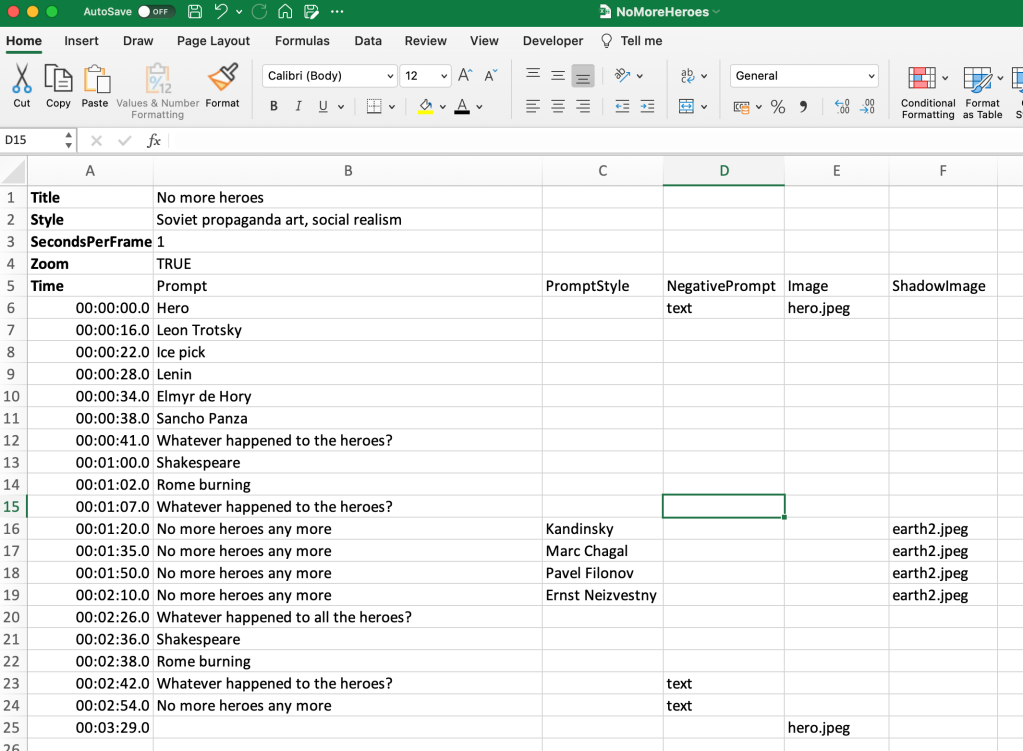
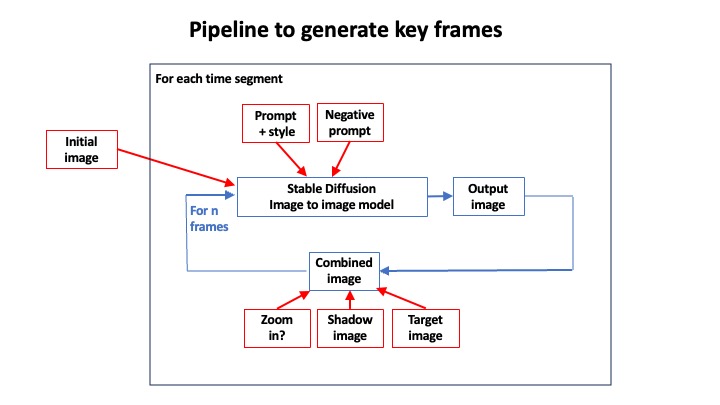
In order to produce an effective music video, I needed the images to change in time with the lyrics. Rather than messing around editing my Python code, I ended up using a Excel template spreadsheet as a convenient way to enter the lyrics alongside the time in the track. It was useful to enter “text” as a negative prompt and a sometimes helpful to mention a particular colour to stop it dominating the output. By default an overall style is added to each prompt, but it is convenient to change the style on certain prompts. By default the initial image is used as a “shadow”, which contributes 1% to every subsequent frame, in an attempt to retain an overall theme. This can also be overridden on each prompt.

Finally, it was very useful to be able to define target images. If defined for the initial prompt, this saves loading an additional Stable Diffusion text-to-image pipeline to create the first frame. Otherwise, defining a target image for a particular prompt drags the animation towards the target, by mixing increasing proportions of the target with the current image, progressively from the previous prompt. This is also useful for the final frame of the animation. One way to create target images is to run a few prompts through Stable Diffusion here.

Although some lyrics explicitly mention objects that Stable Diffusion can illustrate, I found it helps to focus on specific key words. This is my template for “No more heroes” by The Stranglers. It produced an awesome video that I put on GitHub.
Once an Excel template is complete, the following pipeline generates the key frames by looping through each prompt and calculating how many frames are required to fill the time until the next prompt for the desired seconds per frame. A basic GPU takes about 3 seconds per key frame, so a song takes about 10-20 minutes, including inserting a smoothing steps between the key frames.
Sample files and a Jupyter notebook are posted on my GitHub repository.

I’ve started a YouTube channel

Having previously published my music on SoundCloud, I am now able to generate my own videos. So I have set up a YouTube channel, where you can find a selection of my work. I never expected the fast.ai course to lead me here.

PyData London

I presented this concept at the PyData London – 76th meetup on 1 August 2023. These are my slides.

Deep Learning – Faking It

Screen Shot 2017-08-20 at 15.01.01
Thumbnails of real bikes (Bianchi, Giant, Cube…)

Screen Shot 2017-08-20 at 15.01.15
Fake thumbnails generated randomly by Wasserstein Generative Adversarial Network

My last blog showed the results of using a deep convolutional neural network to apply different artistic styles to a photograph of cyclist.  This article looks at the trendy topic of Generative Adversarial Networks (GANs). Specifically, I investigate the application of a Wasserstein GAN to generate thumbnail images of bicycles.

In the field of machine learning, a generative model is a model designed to produce examples from a particular target distribution. In statistics, the output might be samples from a Gaussian distribution, but we can extend the idea to create a model that produces examples of sonnets in the style of Shakespeare or pictures of cats… or bicycles.

The adversarial framework introduces an attractive idea from game theory: to create a competitive form of learning. While a generator learns from a corpus of real examples how to create realistic “fakes”, a discriminator (or critic) learns to distinguish been fakes and authentic examples. In fact, the generator is given the objective of trying to fool the discriminator. As the discriminator improves, the generator is driven to enhance the authenticity of its output. This creates a virtuous cycle.

When originally proposed in 2014, Generative Adversarial Networks stimulated much interest, but it proved hard to make them work reliably in practice. One problem was “mode collapse”, where the generator becomes stuck, producing the same output all the time. However, this changed with the publication of a recent paper, explaining how earlier problems could be overcome by using a so-called Wasserstein loss function.

As an experiment, I downloaded a batch of images of bicycles from the Internet. After manually removing pictures with riders and close-ups of components, there were about 1,200 side views of road bikes (mostly with handlebars to the right, so you can see the chainset). After a few experiments, I reduced the dataset to the 862 images, by automatically selecting bikes against a white background.

Screen Shot 2017-08-20 at 14.45.29
Sample of real bike images

As a participant of part 2 of the excellent fast.ai deep learning course, I made use of WGAN code that runs using Pytorch. I loaded the bike images at thumbnail size of 64×64 (training with larger images exceeded the memory constraints of the p2.large GPU I’m running on AWS). It was initially disappointing to experience the mode collapse problem, especially because the authors of the WGAN paper claimed never to have encountered it. However, speeding up the learning rate of the generator seemed to solve the problem.

Although each fake was created from a completely random starting point, the generator learned to produce images against a white background, with two circles joined by lines. After a couple of hundred iterations the WGAN began to generate some recognisably bicycle-like images. Notice the huge variety. Some of the best ones are shown at the top of this post.

Screen Shot 2017-08-20 at 14.41.19
Sample of images generated by WGAN

I tried to improve the WGAN’s images, using another deep learning tool: super resolution. This amazing technique is used to solve the seemingly impossible task of converting images from low resolution to high resolution. It is achieved by taking downgraded versions of a large dataset of high resolution images, then training a neural network to reproduce a high-res version from the corresponding low-res input. A super resolution network is able to learn about certain properties of the world, for example, it converts jagged curves into smooth ones – a feature I’d hoped might be useful for making wheels look rounder.

Example of a super resolution network on real photographs

Unfortunately, my super resolution experiments did not lead to the improvement I’d hoped for. Two possible explanations are that a) the fake images were not low-res photos and b) the network had been trained on many types of images other than bicycles with white backgrounds.

Example of super resolution network on a fake bicycle image

In the end I was pretty happy with the best of the 64×64 images shown above. They are at least as good as something I could draw by hand. This is an impressive example of unsupervised learning. The trained network is able to use some learned notion of what a bicycle looks like in order to produce new images that possess similar properties. With more time and training, I’m sure the WGAN could be improved, perhaps to the point where the images might provide creative inspiration for new bike designs.

References

Goodfellow, I. J., Pouget-Abadie, J., Mirza, M., Xu, B., Warde-Farley, D., Ozair, S., … Bengio, Y. (2014). Generative Adversarial Networks. 

Arjovsky, M., Chintala, S., & Bottou, L. (2017). Wasserstein GAN. 

Johnson, J., Alahi, A., & Fei-Fei, L. (2016). Perceptual Losses for Real-Time Style Transfer and Super-Resolution.